
For the next 9 days there'll be a blog hop with Hallowe'en themed blocks and giveaways all over the blogosphere.
The Quilting Alleycat
Words & Stitches
Geema's Wonderings
Quilt Doodle Doodles
Bacon Then Eggs
Inga
Briarside Lane
Quilts And Smily Faces
Why Knot?
Quilt Matters
Mad Quilter's Disease
Susie's World
Sew Paint Create
In my case, I have a tutorial for a 12½" (unfinished) bat block!
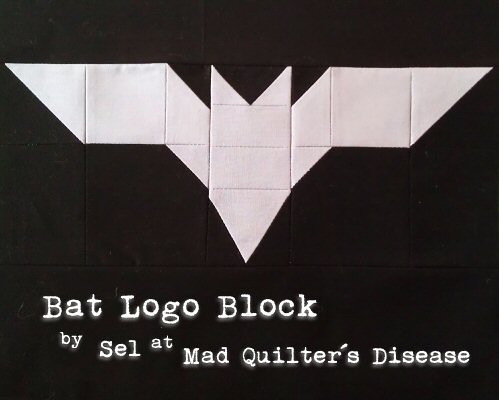
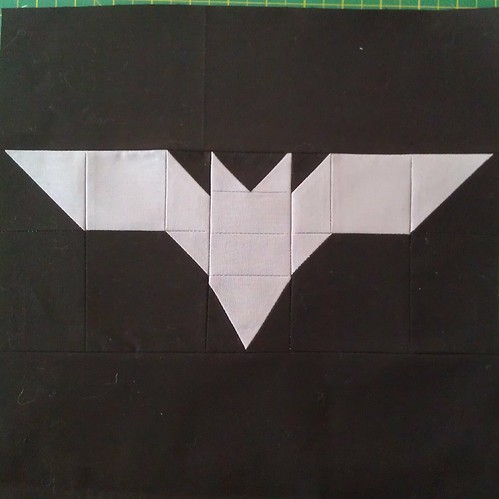
This started life as the logo from the recent Batman movies, but has since morphed somewhat to this:
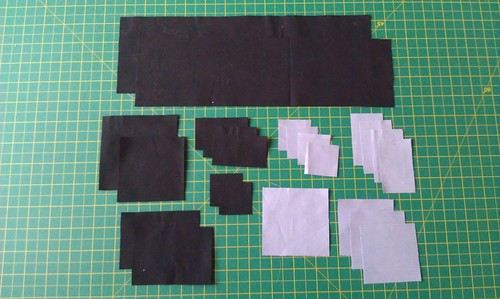
You Will Need:
Colour 1 (Bat)
(In my example, it's grey.)
1 - 3" x 3"
3 - 2½" x 2½"
4 - 2½" x 1½"
4 - 1½" x 1½"
Colour 2 (Background)
(In my example, it's black.)
1 - 3" x 3"
2 - 3½" x 3½"
2 - 1½" x 1½"
3 - 1½" x 2½"
2 - 3½" x 2½"
1 - 3½" x 12½"
1 - 4½" x 12½"
Step 1: marking
Take a pencil or washable marker, and draw a line down the diagonals of:
1 Bat-colour square 3" x 3"
4 Bat-colour squares 1½" x 1½"
2 Background-colour squares 1½" x 1½"
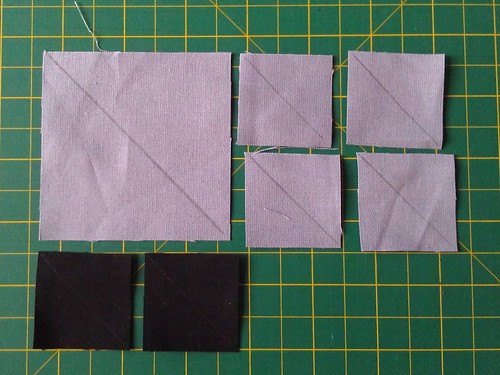
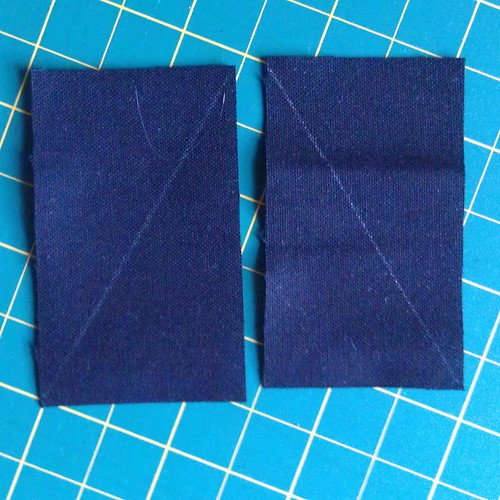
Also draw a line down the diagonals of the 2 Background-colour rectangles 2½" x 1½", but make sure one runs from top right corner to lower left corner, and the other runs from top left corner to lower right corner.
Step 2: sewing the units together
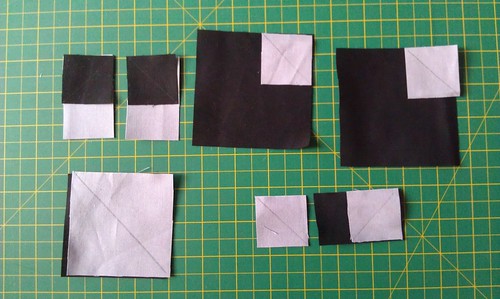
(a). Take the 2 Background-colour squares 3½" x 3½" and place 2 Bat-colour squares 1½" x 1½" in the top right corner as shown in the picture, matching the edges.
(b). Take 2 Bat-colour rectangles 1½" x 2½" and place the 2 Background-colour square 1½" x 1½" at the top of them, ensuring one pencilled diagonal runs top right corner to bottom left corner, while the other runs top left corner to bottom right corner as shown in the picture matching the edges.
(c). Take 2 Bat-colour squares 1½" x 1½" and lay one of them down on the Background-colour rectangle 2½" x 1½", with the diagonal running top right corner to bottom left corner as shown in the picture, matching the edges.
(d). Take the Bat-colour square 3½" x 3½" and lay it on top of the Background-colour square 3½" x 3½" as shown in the picture, matching the edges.
Sew on the pencilled line for (a), (b), and (c). Do not sew (d) yet!
(a)
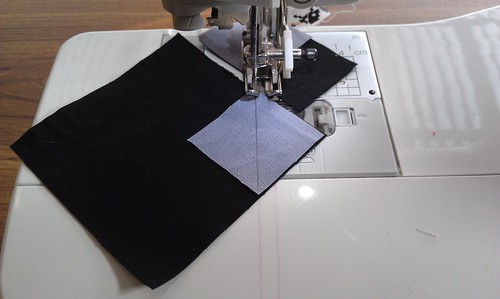
Lay your ruler down ¼" from the seam, and cut off the small corner:
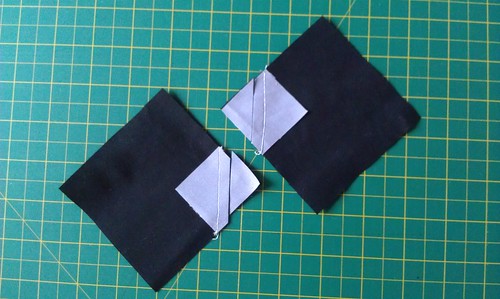
Press seams open.
(b)
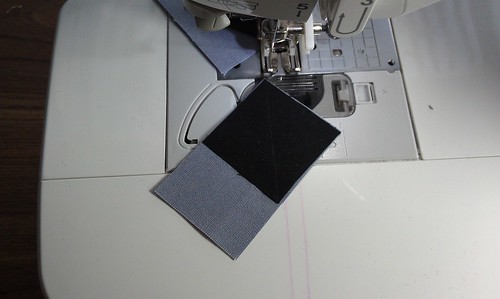
Lay your ruler down ¼" from the seam and cut off the small corner. Press seams open.
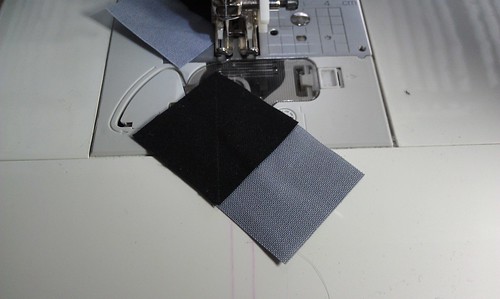
Lay your ruler down ¼" from the seam and cut off the small corner. Press seams open.
(c).
You should have sewn just the first Bat-colour square on the Background-colour rectangle.
Lay your ruler down ¼" from the seam and cut off the small corner. Press seams open.
Then lay down the second Bat-colour square at the other end of the Background-colour rectangle, making sure that the pencilled line forms a 'V' with the seam. Sew on the pencilled line.
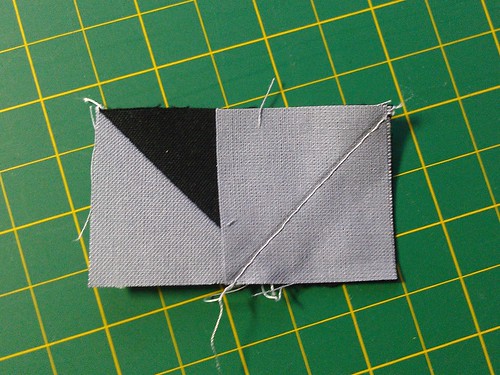
Lay your ruler down ¼" from the seam and cut off the small corner. Press seams open.
Now we're going to deal with (d).
(d).
Sew the seams ¼" either side of the pencilled line:

Lay your ruler down on the pencilled line and cut in half. Press seams open.
Trim your half-square triangle units into to 2½" squares.
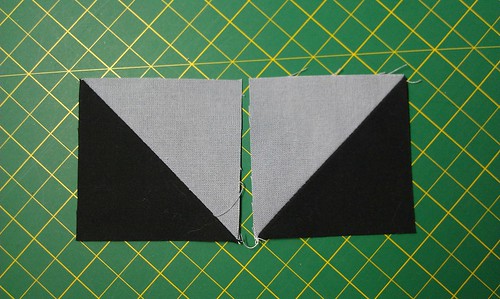
(e).
Remember those two Background-colour 1½" x 2½" rectangles with the diagonals on them?
Take the Background-colour rectangle with the diagonal running from the top right corner to the bottom left corner and lay it on the right side of one of Bat-colour 2½" x 2½" squares.
DO NOT SEW IT.
First, take your ruler and lay it down ¼" from the pencilled line and cut off the small corner.
Then, take the Background-colour rectangle, rotate it upside-down, and flip it over so the 'thin' end of the triangle is at the top of the unit.
NOTE: If you haven't used a solid, as I have, you'll have to cut the opposite side before sewing it, so you get the right sides of the fabric together. Read to the end of the section and it will become clearer.
Sew the seam ¼" from the edge of the fabric. Press seams open.
Now, take the other Background-colour rectangle with the diagonal running from the top left corner to the bottom right corner and lay it on the left side of the unit.
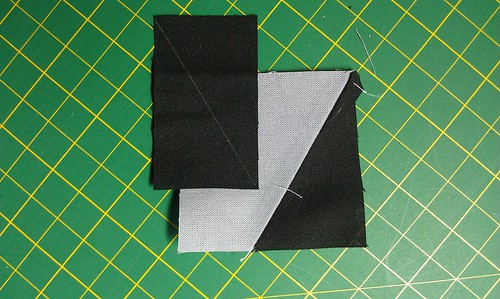
Take your ruler and lay it down ¼" from the pencilled line, cutting off the small corner.
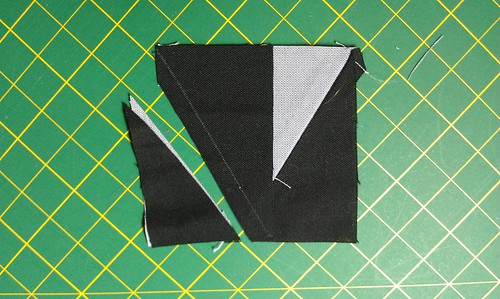
Then take the Background-colour rectangle, rotate it upside-down, and flip it over so the 'thin' end of the triangle is at the top of the unit.
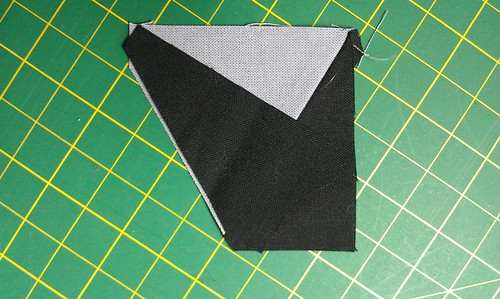
Sew the seam ¼" from the edge of the fabric and press the seams open.
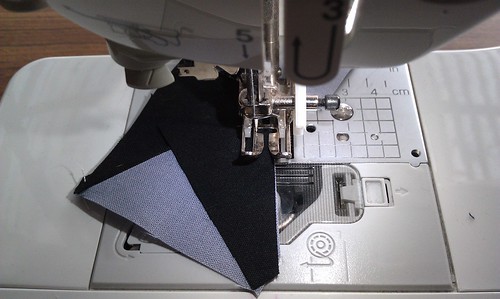
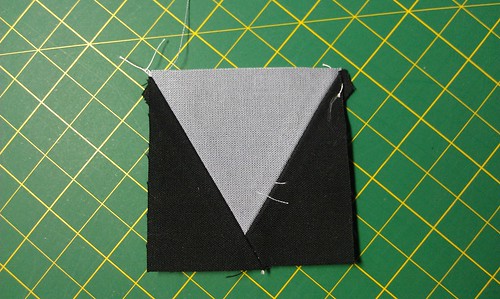
Now you have all the units ready for assembly!
Step 3: Sewing the block together.
I recommend laying all the pieces out so you can see how everything goes together:
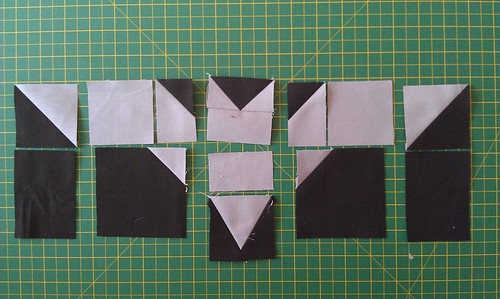
I sewed the 'wing' units together, and attached the 'bat ears' to the 'head' and 'body' units to start with.
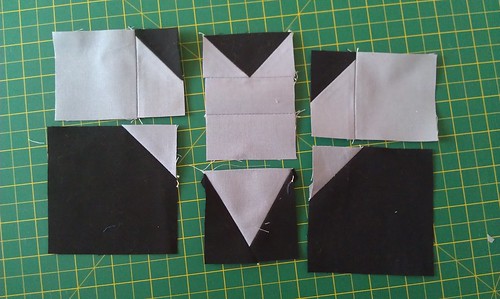
Then sew the backgrounds onto the 'wingtip' units.

Then sew all the vertical seams.
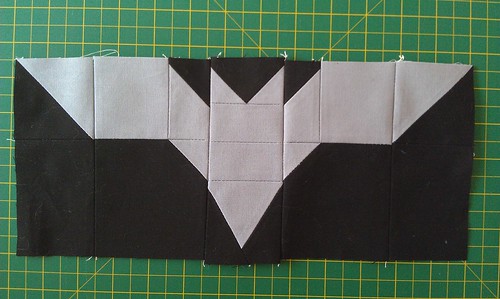
Don't forget to sew ¼" seams all the way!
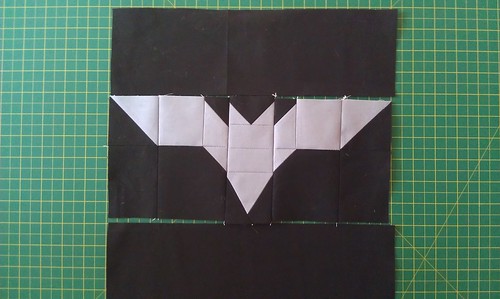
Add the top and the bottom pieces and we're done!
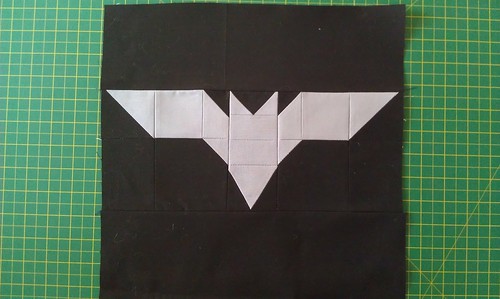
One bat block 12½" x 12½", suitable for that wonderfully WICKED Halloween quilt or cushion!
Thanks so much for coming by, and I hope that you've enjoyed the WICKED blog hop! Don't forget to drop by the other blogs and check out their tutorials and giveaways!
I don't usually do much for Hallowe'en - living in Australia, it barely makes a peep on our holiday radar. However, in the last couple of years I have acquired an American friend in Penny Poppleton who enjoys throwing a party right around Halloween, complete with decorations and dress-ups. So, come Saturday night, I'll be putting on a costume and heading off to Penny's house! There probably won't be any trick-or-treating, but we're going to have a great time all the same!
What are you doing for Hallowe'en? Do you do anything at all?

Great block!!! I don't do much other than set up a little projector outside which displays a halloween picture on the garage front....thanks for sharing/ I am on the 29th. love your block
ReplyDeleteOh my goodness! I LOVE your block! It's absolutely awesome.
ReplyDeleteThis comment has been removed by the author.
ReplyDeleteI used to go to a costume party every year, but that got old (no, wait, maybe I got old?). :) Happy Halloween!!
ReplyDeleteLOVE the bat block! Awesome sauce!
Thanks for sharing the block and the tut. I put on my way to decorated witches hat and hand out candy to the little ghost and goblins here in my small town.
ReplyDeleteOooh, love it! Thanks for the tutorial!
ReplyDeleteHow cool is your block!! Friggen awesome!! :) Thanks for showing the tutorial too! :)
ReplyDeleteOh my goodness--you're absolutely batty! ha!ha! just kidding♥
ReplyDeleteI have no idea what I'll do for Halloween--perhaps I'll dress up and scare small children again this year. That's always entertaining.
Love the 'battiness' of your block!
ReplyDeleteExcellent tutorial! Really cool block and thank you so much for sharing! My daughters are 6 and 8 years old so I enjoy halloween through their eyes :)
ReplyDeleteGreat block and tutorial - thanks for sharing. We dont normally do much for halloween (I live in England) although the children did dress up and go trick or treating last year - this year I will decorate the house up as we are home for halloween (it falls in school half term so usually we go away). Such fun!
ReplyDeleteGreat tutorial on the bat block! Thank you for sharing,
ReplyDeleteThanks for sharing your bat! Really Neat!
ReplyDeleteWOW that is a lot of work and looks to good! Thanks for sharing
ReplyDeleteBats! Is there anything more wicked than bats? I love your block and thank you for the tutorial! They can fly into a really scary quilt! We don't celebrate Halloween out here in The Netherlands, but I am beginning to wonder why......
ReplyDeleteHi Sel,love the block very batty!!!! Thanks for the tutorial and sharing. Our Boys have gone past trick or treating now but enjoy opening the door and scaring the kids who do come trick or treating!!! We usually have a spooky dinner. Susie x
ReplyDeleteYour block is great and you have done an awesome tutorial. We don´t do Halloween in Sweden, but I have sewn one wicked project to display on my wicked day which is tomorrow.
ReplyDeleteThanks for sharing
Britt-Inger in Sweden
Great block! we don't do much for halloween now that our children have left home!
ReplyDeleteThanks for sharing!
Oh how cute! Thank you so much for the tutorial - I plan to make this one! blessings, marlene
ReplyDeleteGreat block. I do love Halloween, such fun pretending to be someone/something else but now I love watching my little ones trick or treating.
ReplyDeleteLove your block. If Batman had a quilt, this would be on it.
ReplyDeleteOh my goodness, that is so cute!!
ReplyDeleteFun bat block! Love the shape, thanks for sharing!
ReplyDeleteCool block, and thanks for the tutorial! I will be home on Halloween, handing out candy to the neighborhood kids.
ReplyDeleteWe have made a tradition of making homemade caramel corn for our closest friends and family. We spend all morning making it and bagging up individual bags. Love to see their smiles and excitement when they get their bag of sweet goodness.
ReplyDeleteThat is one cool bat! Thanks for the tutorial. I'm looking forward to trick or treating with my niece & nephew this year.
ReplyDeleteGreat Block! Thanks for Sharing!
ReplyDeleteI don't decorate for Halloween but I do hand out candy. Love your bat block!
ReplyDeleteGreat bat block! Thanks for the tutorial! We'll be heading to a party on halloween after the kids trick or treat. I'll be passing out treats!
ReplyDeleteLove the bat! Will have to make one of those. My boss wants me to give out candy at his house. He really likes my Wicked Witch of the West cackle. I told him I'd get my pointy hat and fly my broom right over. LOL
ReplyDeleteGreat bat block ,thanks for sharing!
ReplyDeleteThis bat is GREAT!! Thanks for sharing it!!!
ReplyDeleteYour 'batty' block is super cute...I know my DGS would luv it. It would make a great Halloween bag to carry all his treats. Thanks for sharing, happy stitching, Pauline
ReplyDeletegreat little bat It would be easyto add to any quilt to add a wicked touch :)
ReplyDeletethanks for sharing
in stitches
Wicked bat, very modern, and clean.
ReplyDeleteThanks for sharing.
I love your little bat block! Perfect!
ReplyDeleteMy husband and I live out in the country, so we participate in a Trunk or Treat, where we decorate the trunk (or in our case, the back of our Jeep) and pass our treats in our church parking lot. It's a lot of fun!
I like your bat. Thanks for sharing!
ReplyDeleteVery batty--love it! Thanks for the great tutorial. This is my 3rd try with word verification--it hates me!
ReplyDeleteSince we live in the country, we'll be going to our Trunk or Treat. Always fun! Love love your block. It's awesome.
ReplyDeleteLove your block! I'm going to have to make a quilt just out of this block :)
ReplyDeleteLove your batty block. That was a lot of piecing to get that far!
ReplyDeleteWonderful tutorial and very wicked!
ReplyDeleteAwesome, awesome, awesome tutorial and block!!! Thanks for sharing :)
ReplyDeletewow...very kool bat blocks. the kids go trick or treating but this sub has it on the weekend before. :( this year my daughter is in a school play and I have tickets to a hockey game.
ReplyDeleteWhat a cool bat block. Thanks for sharing the tutorial!
ReplyDeleteHi!!! WICKED Block!!! Great tutorial,love that you showed so many pics and great directions!!! I might could make one!!! Yaa!!! Thanks so much!!!
ReplyDeleteGreat bat! Thank you for the tutorial.
ReplyDeleteGreat bat block, thanks for the tutorial...that's going on my to-do list!
ReplyDeleteSuch a wonderful block!! I love it!! Thanks for sharing!!!
ReplyDeleteThis bat is terrifically wicked.
ReplyDeleteGlad you are being dragged into the Halloween spirt. I stay home on Halloween because where I live there will be somewhere between 300and 400 trick or treaters. I do really love seeing the kids dressed up.
Holy batman, is this fun!! Thanks for sharing a great block!
ReplyDeletegreat block thanks for sharing
ReplyDeleteGreat tutorial for a great bat!! Thank you for all the work that went into showing us this! Have fun on Saturday night...what are you going as? Living out in the back of beyond, we don't get trick-or-treaters and all the kids are grown and gone...so it's just a quiet night.
ReplyDeleteSel-Love your bat logo block-thanks for the tutorial. I also love your felines as I have 3 furry helpers who have to put their "stamp" on everything I make, which usually means sitting on it at some point! From California, thanks for sharing
ReplyDelete-really wicked *lol*
ReplyDeleteGreat tutorial, thanks!!!
Liebe Grüße
Bente - Germany
ps. I´m not a computer and this is my 3´th chance to reald the word verification :-(
We enjoy family night and popcorn balls and watch a movie. Thanks for participating in the Wicked hop!
ReplyDeleteRosemary B here:
ReplyDeleteThis is really nice, very creepy too
great tutorial, I know I would like to try this one
Thanks for sharing!
I am hiding out in my basement/sewing room for Halloween. I already warned the neighbors. I love your block and am going to save it to make for the grands at a later date. You forgot to turn off your robot id'er. If this doesn't post the first time I'm not trying again.
ReplyDeleteNice bat block!
ReplyDeleteI live in Germany and we don`t really celebrate Halloween... some houses are decorated with a pumpkin but not really more. I think the "amarican Halloween" would be fun.
This is just wickedly ADORABLE. :) Thanks so much for sharing this little bat with us. I'm so glad I found your blog.
ReplyDeleteWhat a great tutorial! I love your block! Happy Halloween - trick or treat!!!!
ReplyDeleteGreat tutorial. :) We take our kids trick or treating and they dress up but we don't.
ReplyDeleteLove the tutorial! Thank you very much, I am adding it to my batty repertoire :o)
ReplyDeleteWe will be watching a NBA basketball game. We live out in the country so we won't have any ghost or gobblins stopping by. Cute bat design.
ReplyDeleteYour block is super cool.Thanks for sharing!
ReplyDeleteWhat a great block for Halloween...thanks for the tutorial!
ReplyDeletesewing and watching for grands
ReplyDeleteI really love your "bat" lock! Thanks for sharing.
ReplyDeleteCheers
maggie
Thanks for the wonderful tutorial about the bat block. I love it.
ReplyDeleteOverhere in the Netherlands there are only a few who celebrates Halloween. But as a pagan I celebrate it because it the witches New Year :-)
Great block! My grandson would like one of these. There aren't many little ones in our neighborhood, so we will put on our Halloween finery and enjoy a witchey brew with some friends.
ReplyDeleteThanks for the bat tut. I am working this Hallowe'en night. Dressed as a witch.
ReplyDeleteIf a bat can ever be defined as CUTE yours should be. Cute block.
ReplyDeleteGreat Bat block!!
ReplyDeleteGreat block and your piecing is perfect!
ReplyDeleteNow that's the cutest bat I've ever seen! I just answer the door and give treats to the urchins that come calling.
ReplyDeleteI love this! I am pinning it right now for future use!
ReplyDeletethis is wonderful, thanks for a great tutorial
ReplyDeleteI love your bat block! Our kids are grown, DH and I stay home and give treats to the neighbor kids. This is the first year I haven't decorated like crazy. Someone else will have to have the "Halloween House" this year!
ReplyDeleteLove the bat block, and great tute! thanks for sharing.
ReplyDeleteVery "Wicked" block! Thanks for the great tutorial!
ReplyDeleteI love your block so modern and spooky! It was fun sharing this Wicked day with you.
ReplyDeleteYour block is just plain beautiful. I love it! And your tutorial was so easy to read. Thank you for sharing with us all.
ReplyDeleteWe live in the country so never have trick or treat ghosts and ghouls. We try to attend at least one cemetery walk this time of year. The living tombstones are so cool. Thanks for sharing your scarey BAT
ReplyDeleteThanks for the tutorial. A great "wicked" block!
ReplyDeleteFun block amd great tut!
ReplyDeleteMy DH and I decorate the house with animated witches, ghosts, etc then dress up in costume to hand out candy to the neighborhood kids while spooky music plays in the background.
You make that look so simple.
ReplyDeleteNot doing much of anything for Halloween. Will probably end up having to work
Great bat. You have done a great job. I don't celebrate Halloween but I signed up for the wicked blog hop and now I have a Halloween mini to use for decoration.
ReplyDeleteThat's pretty awesome. It reminds me of those Tangram things. You may not know what I'm talking about but they are some squares, triangles, and diamonds of various sizes that you use to create different shapes. Totally cool bat!
ReplyDeleteI'll be escorting my kiddies for trick or treats, coming home to a steamy cuppa tea and snitching a few goodies from their bags!
ReplyDeleteI absolutely love this block and I know one of my boys will go "batty" over it so I'm slipping you tute into my favs and will be giving this a go!
Thank you for sharing this fabulous block, Congratulations on all the accolades! :)
Thanks for the nice tutorial.
ReplyDeleteGreat bat, and super tutorial. I'm going to hang out with my 1 year old grandbaby on Halloween--it'll be interesting at the very least! Thanks for sharing with us all.
ReplyDeleteWhat a fun little bat, thank you so much for sharing and being a part of the hop!
ReplyDeleteFabulous! What a clever design and how lucky we are that you shared it with us. Thanks so much!
ReplyDelete